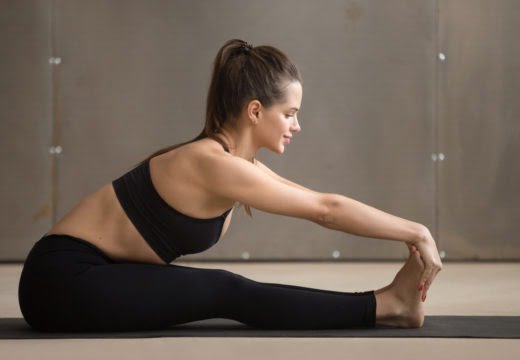
Surya namaskar and it’s Benefits
SURYA NAMASKAR (SUN SALUTATION)
In Indian Tradition, We accept the sun as a god. we can’t even think about life without the sun. Sun is the origin of light and energy for the earth. people devote water in the morning facing the sun in many houses to praise the sun. Indian yogic tradition has a specific value of sun salutation because the sun is a part of our life, yogis always bow to the sun before they start the day.
Indian ancient books have mentioned that the distance between the Sun and Earth is 108 times the diameter of the sun. and the distance between the moon and earth is 108 times the diameter of the moon, Sadhguru From isha foundation says that we have 72000 Nadis in our body which is connected to 112 chakras, and there are 114 chakras in our body, 2 of them is out of the physical body, and then 4 out of 112 will balance itself if 108 chakras will be balanced. There are 8.4 Million postures is in Hatha yoga, where 84 postures are main if one achieves the 1 posture properly. his chakras will be aligned with cosmic energy and one can feel the things he never imagined.
That’s why many yogis practice 108 salutations, which have amazing physical and mental benefits.
What is a Surya Namaskara (Sun Salutation)?
Surya Namaskara is a combination of 12 steps or 7 postures in ascending and descending order. There’s so many sun salutation is available now like ashtanga sun salutation A, B, Iyengar sun salutation. But the main and traditional sun salutation is hatha yoga sun salutation. this is also part of the Yoga Retreat Rishikesh. Here we’ll show you the traditional sun salutation. But before we show you sun salutation steps. Just remember this is not a competition, do not rush, feel the postures, and focus on your breathing along with the steps.
Surya Namaskar - 12 Steps?
- Pranam asana (Namaskar Mudra) (Exhale)
- Hasta Utthanasana (Inhale)
- Pada Hasta asana (Exhale)
- Aswasanchalana (Inhale)
- Parvat asana (Exhale)
- Ashtanga namaskara ( Retain )
- Bhujangasana (Inhale)
- Parvat asana (Exhale)
- Aswasanchalana (Inhale)
- Pada Hasta asana (Exhale)
- Hasta Utthanasana (Inhale)
- Pranam asana (Namaskar Mudra) (Exhale)
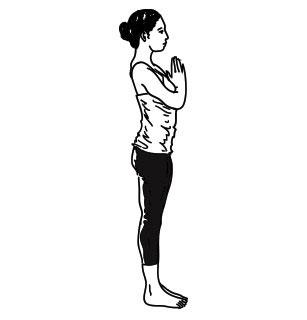
1- Pranam asana
Breathing – Exhale
Instruction:- Stand Straight and keep your both feet together because whenever we give respect to someone in Indian culture, we must keep our feet together, but anatomically you can open your feet, hip-width apart. if you have any issues with your knees or feet. and now close your eyes and observe your weight on both feet evenly, make sure your 4 points are pressed equally, if you don’t know how to observe, just close your eyes and move your hips left, right, forward, and backward.
As you checked this in Yoga class, just make sure your knee is above your ankle and hips are even, tailbone tucked, the center of the chest ( sternum ) is up towards the neck, and lungs are opened outside, make sure don’t bring your lower ribs out, at the same time shoulder externally rotated and both palms together, crown head pulled up, and feel the lengthened neck.
Now if you don’t know all the mantras, Just chant 12 times “OM SURYAY NAMAH”, and feel the energy between your both palm, of your body, and be grateful for what the sun gave you.
(picture credits – Sri Sri Yoga centre – art of living)
2- Hasta Utthanasana
Breathing – Inhale
Instruction:- Hasta utthan asana is a backbend posture, I’d suggest that if someone has high blood pressure or back problem, make sure you don’t bend your back or Use the wall, but still remember do not exhale during this posture. this posture should be done with inhaling.
So Now as you raise your both arms up, make sure You don’t bend your knees, if you bend your knees while holding the posture, it can hurt your back at some point. So keep Your knees straight activate your thigh, roll the butts down or you can say tuck tailbone in.
Another factor is thoracic, We don’t bend from our lower back, Our priority should be from the upper back if you always try to bend your lower back, after some years you’ll start to feel lower back pain.so keep remembering to try to bend from the upper back, neither from lumber nor cervical. and take a deep breath. and for the stable posture you can slightly push butts forward.

(picture credits – Sri Sri Yoga centre – art of living)
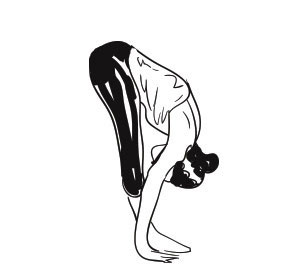
3- Pada Hasta asana
Breathing – Exhale
Instruction:- Pada Hasta asana is a forward bend Posture, I’d suggest to those people who have a Slip disc or kind of headache, They can avoid the posture or just keep in your mind that back should be straight and then try to bend forward if you keep that in your mind, you might feel stretch in your hamstring slowly, But if You don’t, it means you are getting curve in your back, avoid the posture, and do this in the wall or chair.
Now as we bend forward from Hasta utthanasana, slightly shift weight towards the toes. keep your chest open and then connect your chest to your back, make sure don’t squeeze your chest, breath properly. and elongate your spine, then close your eyes, and feel the skin and muscle movement of the back of your thigh(hamstring).
(picture credits – Sri Sri Yoga centre – art of living)
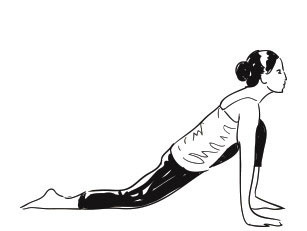
4- Aswa Sanchalana
Breathing –Inhale
Instruction :-After Pada Hasta Asana , take your Left foot back and and drop your knee to the floor and at the same time make sure top of the 5 toes of back foot evenly pressed, and the front foot, press your heel and make sure your knees above the ankle or slightly forward, both thigh rotate inwardly, and chest open, neck relaxed.shoulder away from neck and relaxed , hips square.
(picture credits – Sri Sri Yoga centre – art of living)
5- Parvat asana
Breathing –Exhale
Instruction :- parvat asana is called mountain pose in English, it means the geometry of the pose should be like a mountain, means strong and tall. after aswa sanchalana , we take our right leg back , then make a plank, and lift the buttocks up as high as you can, at the same time press you palm and rotate your shoulder externally, neck relax and look between both feet, Shoulder blade apart and pull the hamstring up. thigh slightly rotates in to find good stability on hip. and lift you tailbone higher.
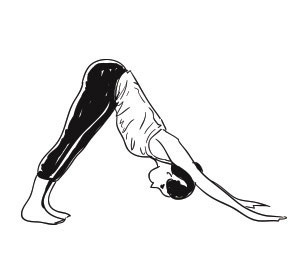
(picture credits – Sri Sri Yoga centre – art of living)
6- Ashtanga namaskara
Breathing – Retain
Instruction :- Ashtanga means asht- Eight and anga – Limb, it means eight limbs of the body are touching to the ground. Many people in India still Bow in front of temple like ashtanga namaskara, eight limbs ( 2 foot, 2 palms, 2 knees, Chest and Chin), One who practice this pose every day will never get arthritis.
After parvat asana, retain the breath and bring your shoulder above your wrist, make a plank, and then drop your knee-chest and chin. if one has a back or neck issue, make sure don’t drop your chest down or use a bolster under the chest.
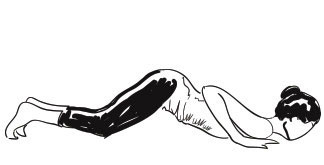
(picture credits – Sri Sri Yoga centre – art of living)
7- Bhujangasana
Breathing –Inhale
Instruction:- From ashtanga namaskara, slowly drop you pelvic and belly down, adjust your palm right under your shoulder and lift your chest up, keep your elbows in, shoulder relax and down, open your chest, color bone broad, lift the center of the chest(sternum) high, now try to lift your belly button(navel) up off to the floor and relax your butts as long as you can,
Try to use the lower back muscles to lift your belly off to the floor first and then take press the palm to expand your chest more, relax your butts or you can put bolster under your pelvic. Engage your butts only if neccesary.
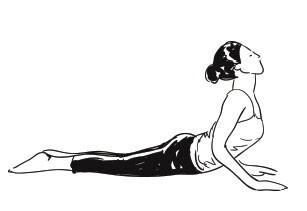
(picture credits – Sri Sri Yoga centre – art of living)
8- Parvat asana
Breathing –Exhale
Instruction :- parvat asana is called mountain pose in English, it means the geometry of the pose should be like a mountain, means strong and tall. after aswa sanchalana , we take our right leg back , then make a plank, and lift the buttocks up as high as you can, at the same time press you palm and rotate your shoulder externally, neck relax and look between both feet, Shoulder blade apart and pull the hamstring up. thigh slightly rotates in to find good stability on hip. and lift you tailbone higher.

(picture credits – Sri Sri Yoga centre – art of living)
9- Aswa Sanchalana
Breathing –Inhale
Instruction :-After Pada Hasta Asana , take your Left foot back and and drop your knee to the floor and at the same time make sure top of the 5 toes of back foot evenly pressed, and the front foot, press your heel and make sure your knees above the ankle or slightly forward, both thigh rotate inwardly, and chest open, neck relaxed.shoulder away from neck and relaxed , hips square.
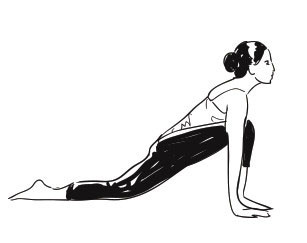
(picture credits – Sri Sri Yoga centre – art of living)
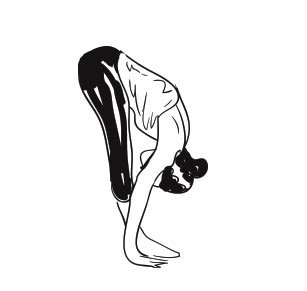
10- Pada Hasta asana
Breathing – Exhale
Instruction:- Pada Hasta asana is a forward bend Posture, I’d suggest to those people who have a Slip disc or kind of headache, They can avoid the posture or just keep in your mind that back should be straight and then try to bend forward if you keep that in your mind, you might feel stretch in your hamstring slowly, But if You don’t, it means you are getting curve in your back, avoid the posture, and do this in the wall or chair.
Now as we bend forward from Hasta utthanasana, slightly shift weight towards the toes. keep your chest open and then connect your chest to your back, make sure don’t squeeze your chest, breath properly. and elongate your spine, then close your eyes, and feel the skin and muscle movement of the back of your thigh(hamstring).
(picture credits – Sri Sri Yoga centre – art of living)
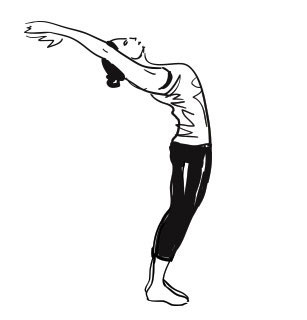
11- Hasta Utthan asana
Breathing – Inhale
Instruction:- Hasta utthan asana is a backbend posture, I’d suggest that if someone has high blood pressure or back problem, make sure you don’t bend your back or Use the wall, but sill remember do not exhale during this posture. this posture should be done with inhaling.
So Now as you raise your both arms up, make sure You don’t bend your knees, if you bend your knees while holding the posture, it can hurt your back at some point. So keep Your knees straight activate your thigh, roll the butts down or you can say tuck tailbone in.
Another factor is thoracic, We don’t bend from our lower back, Our priority should be from the upper back if you always try to bend your lower back, after some years you’ll start to feel lower back pain.so keep remembering to try to bend from the upper back, neither from lumber nor cervical. and take a deep breath. and for the stable posture you can slightly push butts forward.
(picture credits – Sri Sri Yoga centre – art of living)
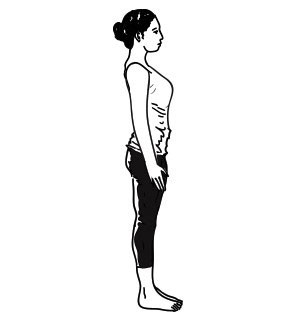
12- Pranam asana
Breathing – Exhale
Instruction:- Stand Straight and keep your both feet together because whenever we give respect to someone in Indian culture, we must keep our feet together, but anatomically you can open your feet, hip-width apart. if you have any issues with your knees or feet. and now close your eyes and observe your weight on both feet evenly, make sure your 4 points are pressed equally, if you don’t know how to observe, just close your eyes and move your hips left, right, forward, and backward.
As you checked this, just make sure your knee is above your ankle and hips are even, tailbone tucked, center of the chest ( sternum ) is up towards the neck and and lungs are opened outside, make sure don’t bring your lower ribs out, at the same time shoulder externally rotated and both palms together, crown head pulled up, and feel the lengthened neck.
(picture credits – Sri Sri Yoga centre – art of living)
Benefits of Surya Namaskar ?
- If one wants to lose weight, they can slowly increase the number of Surya namaskara.
- Improves blood circulation in the whole body.
- Improves the health of the hair as blood circulates to the head.
- improves strength.
- help to increase the mobility of the spine, ankle, shoulder etc.
- removes skin related problem because of proper blood circulation.
- Relieves the back pain.
- reduces arthritis, joint pain.
- improves stamina.
- release the tension of the whole body.
- increases flexibility.
- relieves all respiratory system problems,
- relieves all digestive system problems.
- keeps you away from any mental problem.
- align your chakras with the sun and helps to balance your all chakras.
- tones the muscles.
- makes you calm and more focused.
Frequently Asked Questions(FAQ)
What are the benefits of Sun Salutation?
- If one wants to lose weight, they can slowly increase the number of Sun Salutation.
- Improves blood circulation in the whole body.
- Improves the health of the hair as blood circulates to the head.
- improves strength.
- help to increase the mobility of the spine, ankle, shoulder etc.
- removes skin related problem because of proper blood circulation.
- Relieves the back pain.
- reduces arthritis, joint pain.
- improves stamina.
- release the tension of the whole body.
- increases flexibility.
- relieves all respiratory system problems,
- relieves all digestive system problems.
- keeps you away from any mental problem.
- align your chakras with the sun and helps to balance your all chakras.
- tones the muscles.
- makes you calm and more focused.
What is the Sanskrit name of Sun Salutation ?
Sanskrit’s name of Sun Salutation is “Surya namaskar”.
Who should not practice Surya Namaskar?
if someone have back injury, ankle injury, pregnant woman, they should not practice Surya namaskar.
Can hernia patient practice surya namaskar?
Hernia patient should not practice back bend during sun – salutation. otherwise skip sun salutation.
Why 108 surya namaskar ?
Indian ancient books have mentioned that the distance between the Sun and Earth is 108 times the diameter of the sun. and the distance between the moon and earth is 108 times the diameter of the moon, Sadhguru From isha foundation says that we have 72000 Nadis in our body which is connected to 112 chakras, and there are 114 chakras in our body, 2 of them is out of the physical body, and then 4 out of 112 will balance itself if 108 chakras will be balanced. his chakras will be aligned with cosmic energy and one can feel the things he never imagined.
That’s why many yogis practice 108 salutations, which have amazing physical and mental benefits.
You May Also Like
Which is the best location for a Yoga Teacher Training Course?
April 27, 2022Upavistha konasana
December 10, 2020